Replacing the High Voltage Block on a Sony 46" Rear Projection Television
I’m three for three on major appliance, electronics, and automotive repairs and probably saved around $1,500 in the last couple of weeks thanks to the internet and the generosity of people sharing what they know. So here I am sharing it back. What follows is a complete how-to for replacing the high voltage block (HVB) (part #8-598-955-32) in a Sony KP-46WT510 rear-projection television.
The first thing you need to do is diagnose the problem correctly. Here were the symptoms I experienced that pointed to a failure of the HVB:- Intermittent zapping noise prior to failure (probably electrical arcing)
- 8 blinks of the standby light, repeated
- Scorching, soot on the HVB
- Volume levels decreasing gradually over time
- Anecdotal evidence that this was a common failure
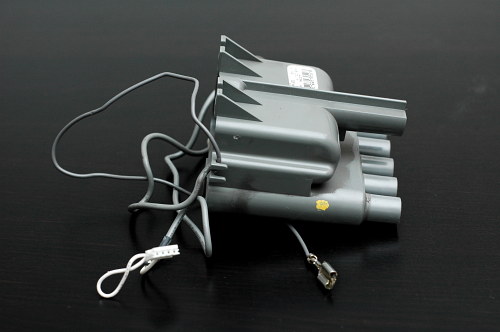 Dead high voltage block
- Unplug your television.
- Unscrew the wooden back panel. There are about 10 screws holding it in. I had better luck using a hex socket wrench to get the screws out. Careful around the back connectors because that bit is flimsy.
- Remove the back panel. Inside there's another piece of wood painted black. It just slides out the back.The HVB is hanging from a metal bracket above the circuit board. There are large red wires going into it. It is connected to the metal bracket by one screw through the top. It is also held in place by two plastic prongs.
There are two wires coming from the HVB. One going up to the metal bracket (a ground wire?) and one going to a four pin connector on the circuit board.
- Wiggle the 4-pin connector gently to pry it free. Make a note of which way it plugs in (on mine, the black wire was on the right, looking at the back of the television.)
- The ground wire has a spring clip connector with a tiny little button on one side. Squeeze the clip and button and pull and it comes free easily. If you can’t see it, you can unscrew the bracket it’s connected to for a better angle.
- Once those wires are disconnected you can wiggle the HVB straight out towards you. Be careful not to damage the plastic mounting prongs.
- There are four red wires going into the HVB. Label them before you disconnect them so you know where they go in the new unit.To disconnect the red wires: first slide the rubber boot well up the red wire. Then push the red wire into the HVB, twist, and pull. You should be able to feel it wiggle around when you push it in and twist and then you can pull it out. Do not force it. There are little wings on the head that prevent the wires from being pulled out by accident. If you just pull you’ll probably damage the wires. Slide the boot up, push, twist, pull and they come out very easily. Repeat for the other three.
- The HVB is connected to a black plastic mounting bracket with one screw. Unscrew it and remove the HVB.
- Connect the new HVB to the old black plastic mounting bracket.
- Reconnect the red wires into the correct holes. They lock in automatically. Push the wires in until they click and won't come free then slide the rubber boot down to hold them in place.
- Mount the HVB back onto the metal bracket and screw in place.
- Reconnect the 4-pin connector to the circuit board.
- Reconnect the ground wire.
- Close her up.
Comments
-
Shash on 2008-04-10 09:37:19 wrote: thank you very much for sharing the instalation instuction we found it very helpful n fixed our 51in sony tv in 20 mins. really excelent job.Thank you very very much.
-
John on 2008-04-10 09:44:03 wrote: You’re welcome! Thanks for letting me know it helped—you’ve brightened my day. :-)
-
Elana on 2008-04-18 09:59:07 wrote: Thanks so much for posting these instructions online, I had no idea what was wrong with my tv and your site was the only one that helped, now my tv works like new! Thanks!
-
Deanna on 2008-05-29 22:09:29 wrote: Hi, I wish we had seen this before we tried to replace our hvb. We had sketchy instructions, and they didn’t say push in before twisting and pulling the wires out. We broke a few of the prongs, so we fabricated new ones with the end of a fuse. Anyway, this fix worked well for a few weeks. Now we are having red flashes again and the tv shuts off and the red light on the front blinks 8 times again, like before. We have tried adjusting the red gun in the front by twisting the screw a little counter-clockwise. No results. do you have any suggestions for us? We would appreciate any info available.
-
John on 2008-05-29 22:18:36 wrote: Sorry, Deanna, I don’t know what could be wrong.
-
Eric on 2008-07-18 11:04:00 wrote: Thanks so much for the great step by step instructions. I was a little nervous doing this by myself, but with you instructions I saved myself about $175 in labor!! Thanks!!
-
Tim on 2008-07-19 14:48:51 wrote: Hi, My Sony TV has the same problems (light blinking 8 times) but I do not notice the other symptoms. I’m planning to attempt this repair nonetheless. I have basic experience in electronics (done some soldering, messed around with motherboards and computer hardwares) and I would like to know what precautions are needed in performing this repair. Is there any danger messing with the high voltage block? did you discharge any components before the repair? if so how did you do it? Any comment is appreciated. Also, thank you for the excellent info in this website.
-
John on 2008-07-19 15:45:32 wrote: I just unplugged mine and let it sit overnight in case something had some charge stored up. I didn’t actively discharge anything beyond that.
-
Tim on 2008-07-19 16:44:23 wrote: Thanks for the reply, John. Just a question, did you high voltage block show some burn mark or indication of any damage? Also, My TV was working perfectly fine yesterday but it just suddenly stops working today. Was your experience similar? Thanks for the comment.
-
John on 2008-07-19 17:38:43 wrote: It had some scorch marks on one side. But it was pretty light. Mine was making intermittent zapping noises for a while but then it stopped working suddenly. It actually died while I was watching it. TV just shut down and the light started blinking. I did notice that for a few weeks prior to it dying, I had to turn the volume up about 20% higher than normal to hear it properly.
-
Heather on 2008-08-27 13:16:42 wrote: Thank you so much. This saved us $450. I did it myself - without my husband’s help in about 20 minutes.
-
Dave on 2008-10-25 20:22:00 wrote: I have a different brand tv but it looks like you described. I accidentally just pulled one of the red wires without twisting or pushing first. When it came out it looked like I had ripped the wire out of something or some where??? Now my tv makes a high pitch ticking noise when you turn it on. Do you know if I can I fix that. tx Dave
-
John on 2008-10-26 18:53:31 wrote: I don’t know. But you’ll probably at a minimum need a new wire.
-
gek on 2008-11-25 04:04:37 wrote: does it really have a high voltage eventhough its been a month I havent plugged in my tv…just curious, because imma bout to change my hvb? thanks! can somebody tell me some pointers what to watch out for. thanks!